A DC motor is a fascinating device that transforms electrical energy, supplied through direct current, into mechanical energy. This mechanical energy spins the rotor, the speed of which is determined by the resultant force.
When a current-carrying wire is introduced to a magnetic field, it experiences a force. In our basic DC motor, this magnetic field is provided by a magnet. As a result, the rotor (our wire) undergoes torque and initiates rotation.
How?
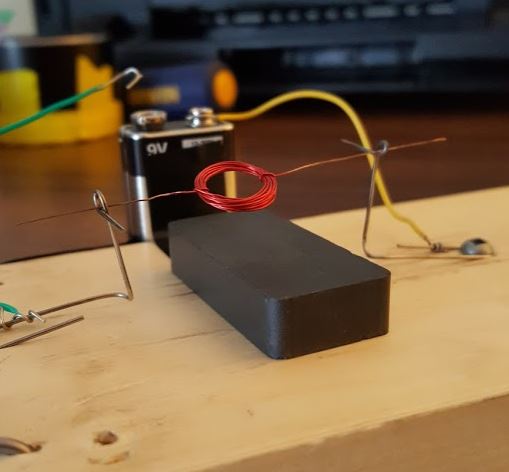
I constructed a rudimentary DC motor using a ceramic magnet, paperclip, screws, a 9v battery, copper wire, and electrical wire. Here's how:
The 9v battery generates the current that runs through the rotor.
Electrical wires were used to connect the battery to the paperclips, which held the rotor.
When the rotor sits in the paperclip supports, only the top and bottom sections experience force because they are oriented perpendicularly to the magnetic field. The rotor was created by wrapping copper wire into a several coils.
A ceramic magnet was placed directly under the rotor and that is what provides the magnetic field that develops force in the wire.
The force developed in the wire depends on the amount of current in the wire, the length of the wire, and the strength of the magnetic field.
The direction of the force is based on the direction of current in the wire and the magnetic field. Depending on which side of the magnet is exposed, the direction of the resulting magnetic field changes. If the rotor contains 20 loops of wire, it experiences 20 times the force of one loop. Using right-hand rule it is clear the top and bottom sections experience a forces in a opposite directions, which tends to make the rotor rotate.
Youtube Demonstration
Components
9 V Battery
20 AWG Copper Wire
Paper Clips
Wood Base
Ceramic Magnet
Battery Snap
Step-by-Step Guide
Coil 20 AWG magnet wire around a compact cylindrical object.
Use a razor blade to strip only the top surface of the wire. Remember not to touch the sides or bottom!
Completely strip the other straight section of the wire – top, bottom, and sides.
Assemble the DC Motor. Use paperclips to support the rotor and attach the batteries to the paperclips ends.
Secure the paperclips to the wooden base with thumbtacks. Place one paperclip at each end of the magnet.
Adjust the magnet and/or supports as necessary to get the Motor functioning.
Review
Although this motor is quite inefficient due to power loss and bottlenecks inherent to the chosen materials, it beautifully illustrates the fundamental workings of a DC motor. It also demonstrates the measures that are taken to circumvent energy loss when converting electrical energy.